


Hammer and Sear Kit for MK IV 22/45 Installation
Before We Begin
Warning!
- Always make sure the firearm is unloaded before performing any work it!
- Remove all ammunition from the work area before working on any firearms.
- Always wear safety glasses when performing any work on a firearm.
Tools Needed
- Hammer or rubber mallet
- Needle nose pliers
- 3/32" Allen wrench
- 1/16" Allen wrench (included in kit)
- Ruger® Factory pistol manual (for reference)
- A clean, non-slip surface, such as our Cleaning Mat
Notes
- All descriptions of the left or right side of the frame assumes that the frame is pointed down range, away from you.
Disassembly
Step 1
Remove the upper from the frame. Refer to the Ruger® manual if you need assistance.
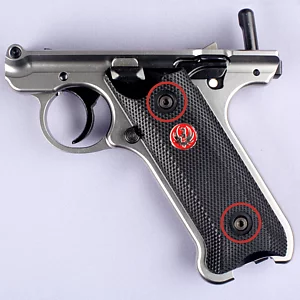
Step 2
Using a 3/32" Allen wrench, remove the grips from both sides of the frame. There are two screws in each side.
Optional Step 2a
While the grips are off, it's common to accidentally knock the Magazine Ejector out of the frame. You may choose to remove it now and set it aside.
To remove it, simply lift on the bottom of the magazine ejector. Be careful not to lose the spring and plunger that come out the top of the ejector.
Optional Step 2b
It's also common for the bolt stop thumbpiece (part 30) fall off the frame. You may choose to remove it now and set it aside.
To remove it, grasp the thumbpiece and lift up while wiggling the part slightly. Once the rear of the thumbpiece is lifted clear of the screw, slide it rearward and it'll come right off.

Step 3
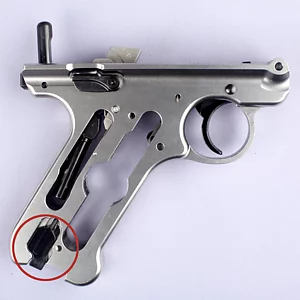
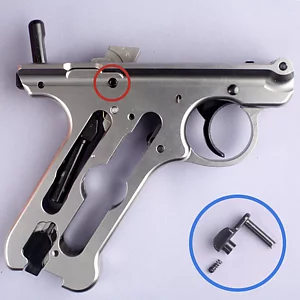
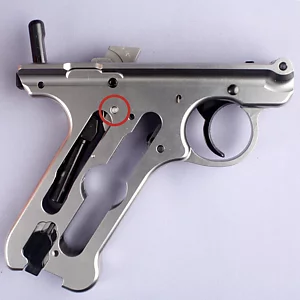
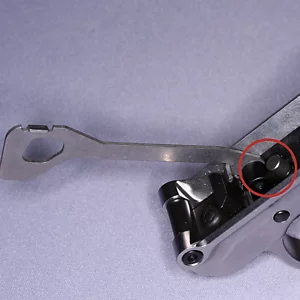
Take a moment to take a look at some of the details of your frame now, so that things look a little more familiar when it's time to reassemble.
- The orientation of the hammer (part 17) and hammer strut (part 18), in particular how the hammer strut rests on the mainspring (see circled area on picture).
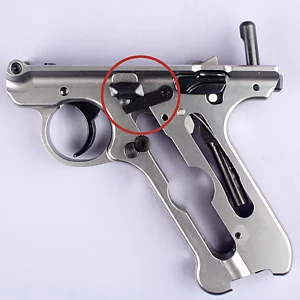
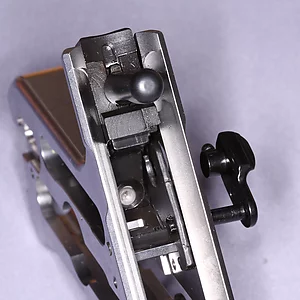
- The orientation of the sear (part 14) and sear spring (part 15).
- The orientation and function of the safety levers (parts 22 and 23) and safety (part 20).
Step 4
- Insert an empty magazine into the frame.
- Disengage the safety
- Pull the trigger to uncock the hammer
- Remove the magazine and set it aside
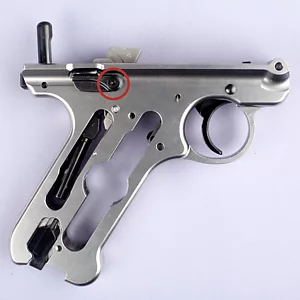
Step 5
- Using the 1/16" Allen wrench, remove the screw that secures the safety lever (part 23) on the right side of the frame.
- Remove the safety lever from the right side of the frame. You may need to use a small screwdriver to carefully pry the lever loose.
Step 6
- Using the 1/8" punch, push the safety lever (part 22) through the right side of the frame and the hammer (part 17). You'll be pushing the lever from the right side to the left side of the frame.
- The safety lever should remain through the left side of the frame and the safety (part 20) at this point.
- Note: be careful not to lose the small plunger and spring (parts 21 and 42) that are inserted from the rear of the safety lever.

Step 7
Remove the hammer (part 17) and magazine disconnect assembly (part 14) from the frame by pulling them straight out the top of the frame.
Step 8
- Pull the safety lever (part 22) the rest of the way out of the frame.
- Remove the safety (part 20) from the frame
Step 9
Using the 1/8" punch, tap out the sear pivot pin (part 37). Once this pin is out, the sear (part 14) and sear spring (part 15) will be loose and should be removed from the frame.
Installation and Assembly
Step 1
- Insert sear pivot pin into frame from the left side approx. 1/8" and using a needle nose pliers set the sear spring onto the pin.
- The loop in the spring should face towards the front of the pistol.
- The long leg of the spring points into the large recess behind the magazine well.

Step 2
- Using the needle nose pliers, position the Volquartsen sear and push the sear pivot pin through the sear and the other side of the frame.
- The sear needs to be positioned behind the short leg of the sear spring.
- Once properly installed, there should be spring pressure when pushing the sear forward.

Step 3
- Install the trigger retaining spring (part 40) into the right side of the frame.
- One end of the spring has a double bend in it. This bend should go through the side of the frame and point down.
- The end of the spring with the curve should be pointing toward the front of the frame.
Step 4
- Insert the safety into the left side of the frame.
- Push the sear and safety forward slightly and insert the left safety lever just until it goes through the frame and safety.
- The cutout in the safety should hook over the sear and hold it forward during this step.
Step 5
- Install the Volquartsen hammer bushing in the Volquartsen hammer.
- The large flange of the bushing needs to be on the side opposite of the rivet head, which is the right side of the hammer once installed in the frame.
- Your kit includes 2 spacers. For most users, the thicker spacer will provide the best fit. However, frame dimensions vary, and if you find this spacer is tight when installing the hammer, use the thinner spacer instead.
Step 6
- Pivot the trigger bar up to allow access to the top of the trigger.
- Insert the trigger spring and plunger into the top of the trigger.

Step 7
- Before you begin, make sure the spring and plunger are installed in the safety lever.
- Position the large flange of the hammer bushing into the cutout on the trigger bar.
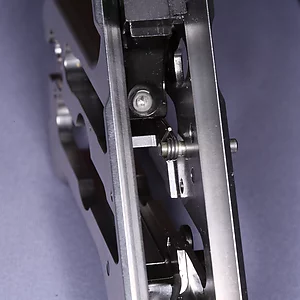
- Lower the hammer, bushing, and trigger bar into position in the frame, making sure that the strut on the hammer is pointed down into the recess in the mainspring plunger.
- Align the hammer bushing hole with the shaft of the safety lever and push the safety lever through. You may need to depress the plunger on the safety to achieve full insertion.
- Verify that the hammer strut is positioned in the mainspring plunger (part 26). There should be spring pressure on the hammer from the mainspring. If there isn't, inspect the alignment of the hammer strut, remove the safety lever, and repeat this step.
Step 8
Install the right safety lever (part 23) and reinstall the screw.
Step 9
Reinstall the bolt stop thumbpiece (30) by sliding the forked end over the
stud of the bolt open stop (part 7) then pushing the hole on the other end over the screw.Step 10
Reinstall the magazine ejector by sliding it into the recess in the frame.
Step 11
Reinstall the grips on both sides of the pistol.
Safety Check
- Cock the hammer and leave the safety off. Pull the trigger and the hammer should go forward.
- Cock the hammer engage the safety. Pull the trigger and the hammer should not move.
- If you are at all unsure about this procedure, have your frame checked by a qualified gunsmith.
